
Salmon sliders, those delightful mini sandwiches, have taken the culinary world by storm. Versatile, flavorful, and perfect for any occasion, they offer a gourmet twist to the traditional slider. In this comprehensive guide, we’ll dive into the world of salmon sliders, exploring everything from the essential ingredients and preparation techniques to serving tips and nutritional information. Whether you’re a seasoned chef or a cooking novice, this article will equip you with all you need to master the art of making salmon sliders.
Introduction to Salmon Sliders
What Are Salmon Sliders?
Salmon sliders are a culinary delight, a fusion of tender, flavorful salmon nestled between the soft halves of a slider bun. These mini sandwiches are not just a treat for the taste buds but also a feast for the eyes. They’re the perfect blend of gourmet and comfort food, making them a hit at gatherings or as a cozy family meal.
Popularity and Versatility
The popularity of salmon sliders is skyrocketing, and it’s easy to see why. They’re incredibly versatile, lending themselves to a variety of flavors and toppings. Whether you’re craving something spicy, tangy, or sweet, salmon sliders can be customized to suit your palate. They’re not just limited to dinner; these sliders are fantastic as appetizers, lunch options, or even as a light dinner. Their versatility extends to their preparation as well – they can be pan-fried, grilled, or even cooked in an air fryer, making them a fantastic option for any cooking style.
Essential Ingredients for Salmon Sliders
Key Ingredients Overview
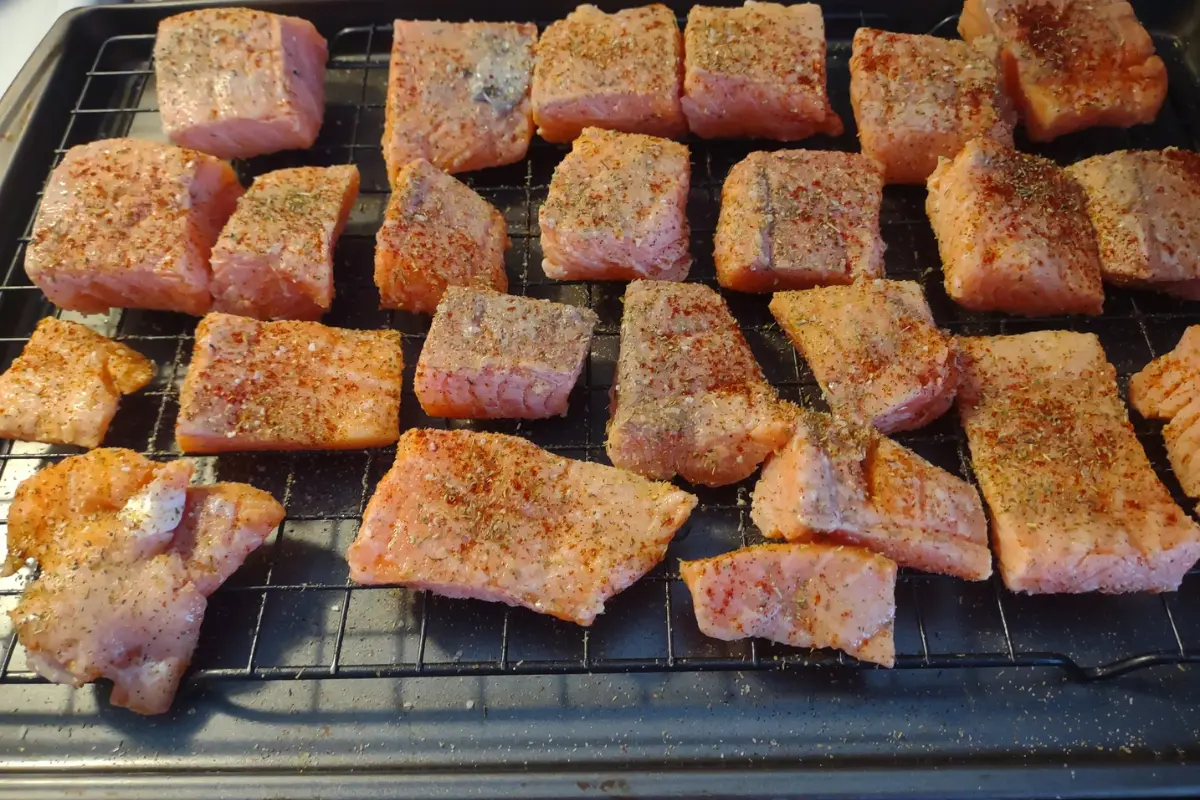
Creating mouth-watering salmon sliders starts with selecting the right ingredients. Fresh salmon fillets are the star of the show. Opt for skinless, boneless varieties for ease of preparation. The freshness of the salmon is key to achieving that perfect, flaky texture and rich flavor.
Next, consider the buns. Sweet Hawaiian rolls are a popular choice, offering a slight sweetness that complements the savory salmon. They’re also sturdy enough to hold up the fillings without falling apart. For a healthier twist, whole grain or gluten-free buns are great alternatives.
The magic of salmon sliders also lies in the toppings. Fresh lettuce, thinly sliced tomatoes, and red onions add a crisp, refreshing layer. For a creamy element, a dollop of homemade hot pepper sauce or a spread of lemon garlic aioli can elevate the sliders to new heights.
Creative Substitutions and Variations
Salmon sliders are wonderfully adaptable. For those watching their carb intake, lettuce wraps are a fantastic low-carb alternative to buns. They add a crunchy texture while keeping the focus on the salmon.
If you’re looking to spice things up, consider adding a kick with chili pepper flakes or a slice of jalapeno. For a smoky flavor, a sprinkle of smoked paprika does wonders.
For vegetarians, a patty made from chickpeas or black beans can replace the salmon, offering a plant-based version of this delightful dish.
And let’s not forget about sauces – they can completely transform your sliders. Experiment with tzatziki, spicy mayo, or even a simple mix of Greek yogurt and dill for a refreshing twist.
Preparing and Cooking Salmon Sliders
Step-by-Step Preparation
Let’s get cooking! First, heat a bit of olive oil in a skillet. Then, place your salmon fillets in. Season them with salt and pepper. Cook for about 8 minutes. As they cook, gently break the salmon apart with a spatula. This helps it cook evenly.
While the salmon cooks, let’s prep the buns and toppings. Slice your Hawaiian rolls or chosen buns in half. Get your lettuce, tomatoes, and onions ready. If you’re using sauces, now’s the time to prep them too.
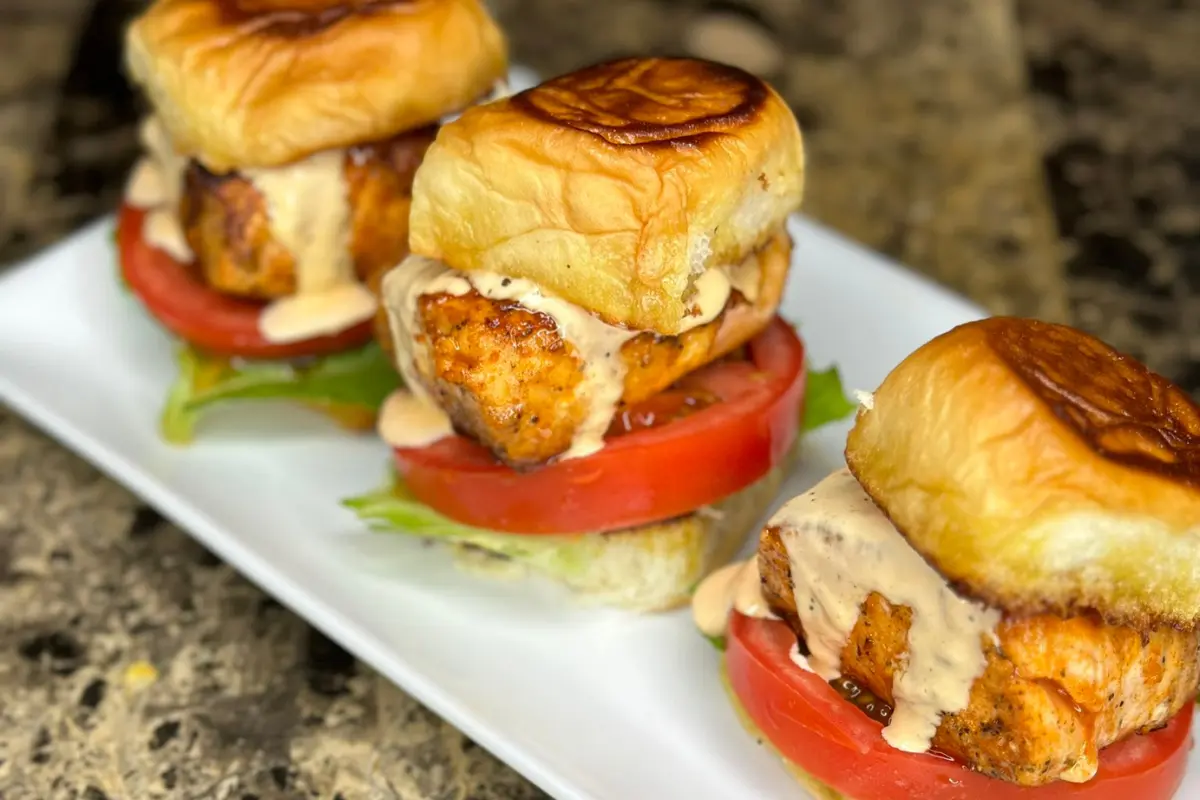
Once the salmon is cooked, it’s assembly time. Place a portion of salmon on the bottom half of each bun. Add your fresh toppings. Then, a dollop of sauce. Top it off with the other half of the bun. And there you have it – your salmon sliders are ready to impress!
Cooking Methods: Pan Fry, Air Fry, Grill
You’ve got options when it comes to cooking salmon for your sliders. Pan frying, as we just described, is straightforward and quick. But there are other ways too.
If you have an air fryer, give it a try. It’s a healthier option as it uses less oil. Just place your seasoned salmon in the air fryer basket. Cook it at 375°F for about 7-10 minutes. You’ll get a nice, crispy outside and a tender inside.
Grilling is another great method, especially for that smoky flavor. Preheat your grill. Cook the salmon for about 3-4 minutes on each side. Just be sure to oil the grill first, so the salmon doesn’t stick.
No matter how you cook it, the key is to keep an eye on the salmon. You want it just right – moist and flaky.
Serving and Presentation Tips
How to Assemble Sliders
Assembling salmon sliders is fun and easy. Start by placing a piece of cooked salmon on the bottom half of your bun. Next, add your choice of toppings. Think lettuce, tomato slices, and a bit of onion for crunch. Now, it’s time for the sauce. A spoonful of your favorite – maybe a tangy aioli or a spicy mayo – goes right on top of the salmon. Finish by placing the top half of the bun. Press gently. Your slider is ready to serve!
Presentation and Garnishing Ideas
Presentation matters! Arrange your sliders on a large platter. Garnish around them with some greens or colorful veggies for a pop of color. If you’re serving them at a party, consider skewering each slider with a toothpick. It keeps them together and makes them easy to grab.
For a more gourmet look, drizzle a little sauce over the top of each slider. Add a sprinkle of herbs like dill or parsley. This not only adds flavor but also makes your sliders look restaurant-worthy.
Nutritional Information
Health Benefits of Salmon
Salmon is not just tasty; it’s also really good for you. It’s packed with protein, which is great for your muscles. Plus, it has omega-3 fatty acids. These are good fats that help your heart and brain. Salmon also has vitamins like B12 and D. They keep your nerves and bones healthy. Adding salmon to your diet is a smart choice for overall health.
Caloric and Nutritional Breakdown
A typical salmon slider isn’t just delicious; it’s also quite nutritious. One slider has about 200-300 calories, depending on the toppings and sauce. Most of these calories come from the salmon and the bun. Remember, the type of bun and amount of sauce you use can change the calorie count. Salmon sliders are a balanced mix of protein, healthy fats, and carbs. They’re a filling and satisfying choice that can fit into a healthy diet.
Storage and Make-Ahead Tips
Refrigeration and Freezing Tips
Got leftovers? No problem. Wrap each slider in plastic wrap or foil. Then, put them in an airtight container. They’ll stay good in the fridge for 2-3 days. For longer storage, you can freeze them. Wrap each one well and put them in a freezer bag. They’ll be fine for up to 2 months. When you’re ready to eat, just thaw them in the fridge.
Reheating Instructions
Reheating is easy. If they’re from the fridge, you can warm them in the oven at 350°F for about 15 minutes. This keeps them moist and tasty. If you’re in a hurry, a microwave works too. Just be careful not to overheat, as this can dry out the salmon. For frozen sliders, let them thaw overnight in the fridge first. Then, reheat as you would with the refrigerated ones.
Additional Recipes and Variations
Other Fish Slider Variations
Not just salmon! Try other fish for sliders. Tuna, cod, or even tilapia work well. Each fish gives a different taste. You can grill, fry, or bake them. Add your favorite spices. Top with lettuce, tomato, or a special sauce. Fish sliders are fun to make and eat. They’re perfect for parties or a family dinner.
Vegetarian and Vegan Alternatives
For a meat-free option, go for veggie patties. Use beans, lentils, or chickpeas. Mix in spices and herbs. Cook them like regular burgers. Serve on buns with your choice of toppings. Vegan mayo or a tangy salsa can add great flavor. These sliders are healthy and tasty. They’re great for anyone wanting a plant-based meal.

Frequently Asked Questions
Common Queries About Salmon Sliders
Can I use canned salmon for sliders?
Absolutely! Canned salmon is a budget-friendly option. Just drain it well and remove any bones. It’s a quick and easy substitute for fresh salmon.
What other fish can I use for sliders?
Feel free to experiment! Tuna, mahi-mahi, halibut, cod, and even tilapia make great alternatives. Each fish brings its own unique flavor to the sliders.
Are salmon sliders healthy?
Yes, they can be! Salmon is rich in protein and omega-3s, which are great for your health. Choose whole grain buns and healthy toppings to make them even better for you.
Can I make salmon sliders ahead of time?
Sure! Cook the salmon and prepare your toppings in advance. But, assemble the sliders just before serving. This keeps the buns fresh and prevents them from getting soggy.
What are some good toppings for salmon sliders?
There’s a lot to choose from! Lettuce, tomato, onion, and cucumber are classic. For sauces, try aioli, tzatziki, or spicy mayo. Get creative and mix and match to find your favorite combo.
How do I keep my sliders from falling apart?
A toothpick through the center works great. It holds everything together, especially if you’re serving them at a party.
Can I make these sliders gluten-free?
Yes, you can! Just use gluten-free buns. There are many tasty options available now.
Conclusion: Savoring the Delight of Salmon Sliders
And there we have it – a deep dive into the delightful world of salmon sliders! From the basics of what they are, to the nitty-gritty of cooking and serving, we’ve covered it all. Remember, salmon sliders are more than just a tasty treat; they’re a chance to get creative in the kitchen. Whether you’re using fresh salmon, going for a veggie option, or trying different fish, there’s a slider for every taste.
These mini sandwiches are perfect for any occasion. They’re easy to make, fun to eat, and sure to impress. So next time you’re thinking of what to cook, give salmon sliders a go. You might just find your new favorite dish!
Happy cooking, and enjoy every bite of your homemade salmon sliders!