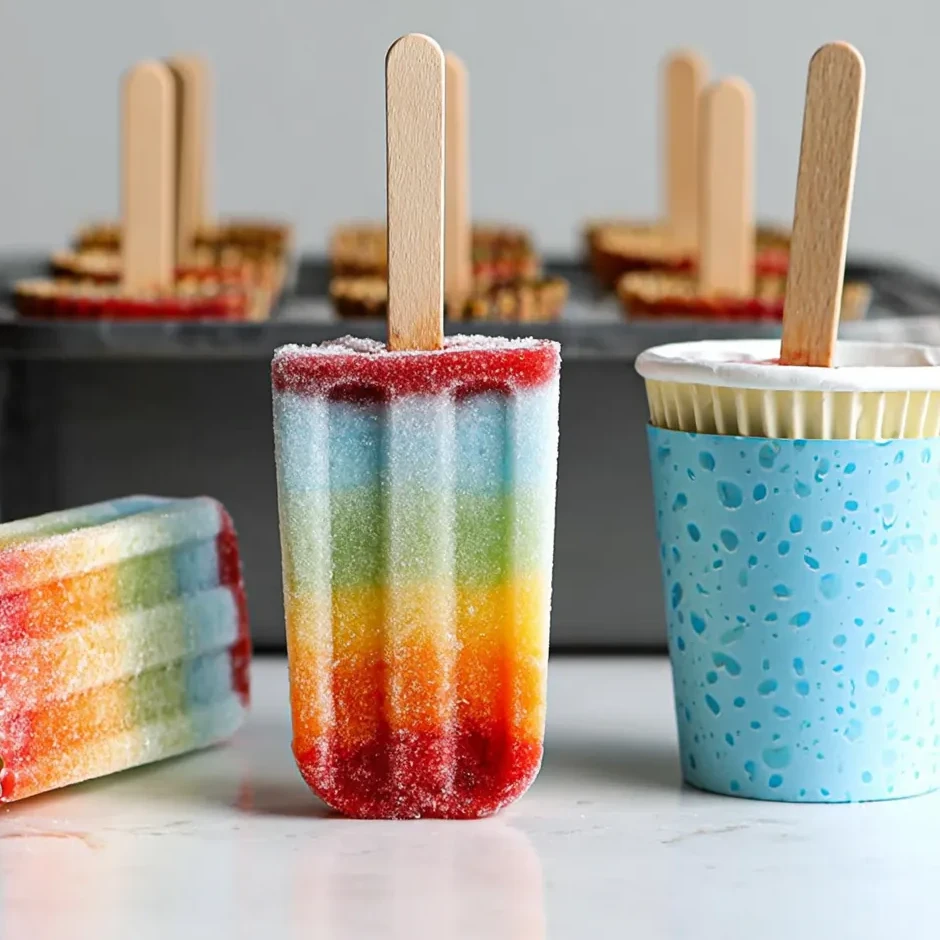
Rainbow Popsicles bring bright color, creamy vanilla flavor, and pure summer fun to any warm afternoon. Unlike fruit-based versions that require several blended mixtures, this recipe uses instant vanilla pudding to create smooth layers in minutes. Because the pudding thickens quickly, you can spoon every color into the cups without freezing between layers. They also make cheerful Dixie Cup Popsicles for parties, playdates, cookouts, or simple family treats. With basic ingredients and easy steps, this recipe gives kids a memorable kitchen project and adults a low-stress dessert.
Story
I love colorful frozen treats, yet traditional layered pops can test anyone’s patience. Usually, each stripe needs time to firm before the next one goes into the mold. Otherwise, the colors swirl together and lose that crisp rainbow look. These Rainbow Popsicles solve that problem with prepared instant pudding. The mixture becomes thick enough to stack almost immediately, so the process stays quick and manageable. Small paper cups also make layering easier because a teaspoon can reach the bottom without smearing pudding around the sides. As a result, kids can help mix colors, tap the cups, and place the sticks. The recipe feels playful, but it never becomes complicated. Better still, Rainbow Popsicles melt more slowly than thin juice pops, which means fewer sticky hands and drips during outdoor snacking. For birthday parties, backyard afternoons, or rainy-day kitchen projects, these creamy frozen treats bring a bright surprise with very little work.
Ingredients
These simple ingredients make eight small Rainbow Popsicles. Use cold milk so the pudding thickens properly, and choose gel or liquid food coloring based on what you already keep in the kitchen.
- 1 box instant vanilla pudding mix, 3.4 ounces
- 2 2/3 cups cold whole milk
- 6 drops red food coloring
- 6 drops yellow food coloring
- 6 drops green food coloring
- 6 drops blue food coloring
- 1 additional drop red food coloring for orange
- 8 small paper cups, 3-ounce size
- 8 wooden popsicle sticks
- 8 small squares aluminum foil
Step-by-Step Instructions
Set out every cup, bowl, spoon, and coloring before mixing the pudding.
Preparing the Ingredients
Pour the cold milk into a large mixing bowl, then add the instant vanilla pudding mix. Whisk for about two minutes, or until the mixture looks smooth and slightly thicker than milk. Do not wait until it reaches a fully spoonable pudding texture. Instead, divide it evenly among five small bowls while it still flows easily. Tint the first bowl red with six drops of red coloring. Tint the second bowl orange with one drop red and five drops yellow. Tint the third bowl yellow with six drops yellow. Tint the fourth bowl green with six drops green. Finally, tint the fifth bowl blue with six drops blue. Stir each bowl with a separate spoon, or wash the spoon thoroughly between colors. This keeps every stripe bright. Arrange the paper cups in a loaf pan or small baking dish so they remain upright while you fill and freeze them.
Cooking Instructions
Spoon a small amount of blue pudding into the bottom of each cup, dividing it as evenly as possible. Gently tap the pan on the counter so the pudding settles into a level stripe. Next, add the green layer without pressing the spoon into the blue layer. Tap again, then continue with yellow, orange, and red. Work carefully, yet do not worry about perfect measurements; slight differences make each pop unique. Cover every cup with a square of foil. Cut a small slit in the center of each foil cover, then push a wooden stick through the opening and down to the bottom of the cup. Place the pan in the freezer on a level shelf. Freeze for at least six hours, although overnight freezing gives the firmest result. To serve, tear the rim of the paper cup and peel the cup away from the frozen pudding pop.
Tips for Perfect Results
A few small choices make the difference between clear rainbow stripes and muddy colors. Keep the pudding loose enough to spread, but thick enough to support each new layer without blending.
Common Mistakes to Avoid
Do not prepare the pudding with only the amount of milk listed for regular pudding, because the mixture may become too thick to layer neatly. However, avoid adding much more than 2 2/3 cups, or the colors may sink into one another. Also, do not let the mixed pudding sit too long before dividing and coloring it. Instant pudding continues to thicken, so quick work gives smoother stripes. In addition, tap the cups gently rather than forcefully. Hard tapping can push one color through another. Finally, keep the freezer tray level. Tilted cups create diagonal layers and may allow the sticks to shift before the pops freeze.
Pro Tips for Better Flavor
Whole milk creates the creamiest texture, although 2% milk also works well. For a richer birthday-cake taste, stir one-quarter teaspoon almond extract into the milk before adding the pudding mix. You can also add one-half teaspoon clear vanilla extract for a stronger vanilla note without changing the colors. For a sixth purple layer, use purple gel coloring instead of mixing red and blue; mixed liquid colors can turn very dark. For softer pastel pops, use only two or three drops per bowl. Most importantly, taste one colored bowl before layering and adjust the flavor only before filling the cups.
Serving and Storage
Rainbow Popsicles taste best straight from the freezer after they have fully firmed.
How to Serve
Peel away the paper cup just before serving, then place each pop on a small plate or in a chilled bowl. For parties, arrange the pops upright in a bucket filled with ice, but serve them quickly so the edges stay firm. They pair nicely with fresh strawberries, watermelon wedges, or a simple fruit salad. Still, you can scatter rainbow sprinkles over the serving tray for birthdays. As Kids Summer Treats, they work especially well after outdoor games, pool time, or backyard lunches. Serve one pop per person because the three-ounce size gives a satisfying treat without feeling heavy.

How to Store Leftovers
Keep the frozen pops in their paper cups until serving because the cups protect the colorful surfaces from frost and freezer odors. After the pops freeze solid, transfer them from the loaf pan to a large freezer bag or lidded container. Press out extra air, then label the container with the date. Store them for up to two weeks for the best flavor and texture. Do not thaw and refreeze the pops, since repeated temperature changes create a grainy texture. If you already removed a cup, wrap the bare pop in parchment paper and place it in a freezer bag. Let an extra-firm pop rest at room temperature for one or two minutes before eating.
Conclusion
These Rainbow Popsicles turn a box of vanilla pudding into a cheerful frozen dessert that feels special without demanding hours of work. The quick-thickening base keeps the colors separate, while paper cups make filling, freezing, and unmolding simple. Whether you serve them at a birthday party or on an ordinary hot afternoon, these Colorful Kids Snacks bring creamy flavor and bright summer energy. Gather five bowls, line up the cups, and create a freezer full of edible rainbows.
Discover more delicious recipes by following me on Facebook and Pinterest.
Frequently Asked Questions
Rainbow Popsicles become easier after you understand the right pudding consistency, cup size, and freezing time.
Can I Make Rainbow Popsicles Without Dixie Cups?
Yes, you can use a standard popsicle mold, silicone mold, or another small paper cup. However, narrow molds make it harder to place the layers without smearing the sides. A three-ounce paper cup offers enough room for a teaspoon, creates a child-friendly serving, and peels away easily. If you use a reusable mold, spoon each color into the center and tap the mold gently after every layer.
Can I Use Cook-and-Serve Pudding Instead?
Instant pudding gives the best result because it thickens quickly without cooking and supports the colored layers almost immediately. Cook-and-serve pudding requires heating, cooling, and careful timing, so it adds extra steps and may form a skin as it cools. Therefore, use instant vanilla pudding whenever possible. Sugar-free instant pudding may work, but its texture can set differently. Start with slightly less milk, then add more only until the mixture becomes smooth, pourable, and thick enough to hold a stripe.
How Long Do Rainbow Popsicles Need to Freeze?
Freeze the pops for at least six hours on a flat freezer shelf. The exact timing depends on your freezer temperature, cup size, and how full you make each cup. Overnight freezing gives the most dependable texture and makes peeling the cups easier. Check one pop after six hours by gently moving the stick. If the stick feels loose or the center seems soft, freeze the batch for another two hours. Once fully frozen, the pops should feel solid from top to bottom and release cleanly from the paper.


Rainbow Popsicles
- Total Time: 6 hours 20 minutes
- Yield: 8 popsicles 1x
- Diet: Vegetarian
Description
Creamy Rainbow Popsicles made with instant vanilla pudding, milk, and colorful layers. Small paper cups make these cheerful frozen treats easy to assemble, freeze, peel, and serve.
Ingredients
- 1 box instant vanilla pudding mix, 3.4 ounces
- 2 2/3 cups cold whole milk
- 6 drops red food coloring
- 6 drops yellow food coloring
- 6 drops green food coloring
- 6 drops blue food coloring
- 1 additional drop red food coloring for the orange layer
- 8 small paper cups, 3-ounce size
- 8 wooden popsicle sticks
- 8 small squares aluminum foil
Instructions
- Pour the cold milk into a large mixing bowl and add the instant vanilla pudding mix.
- Whisk for about 2 minutes, until smooth and slightly thicker than milk.
- Divide the pudding evenly among 5 small bowls.
- Color the first bowl red with 6 drops red food coloring.
- Color the second bowl orange with 1 drop red and 5 drops yellow food coloring.
- Color the third bowl yellow with 6 drops yellow food coloring.
- Color the fourth bowl green with 6 drops green food coloring.
- Color the fifth bowl blue with 6 drops blue food coloring.
- Arrange the paper cups upright in a loaf pan or small baking dish.
- Spoon blue pudding into the bottom of each cup and gently tap the pan to level it.
- Repeat the layering process with green, yellow, orange, and red pudding.
- Cover each cup with a small square of aluminum foil.
- Cut a small slit in the center of each foil cover.
- Push a wooden popsicle stick through each slit and down to the bottom of the cup.
- Freeze the popsicles on a level shelf for at least 6 hours or overnight.
- Tear the rim of each paper cup and peel the cup away before serving.
Notes
- Use cold whole milk for the creamiest texture.
- Work quickly because instant pudding continues to thicken as it rests.
- Use a separate spoon for every color to keep the layers bright.
- For a birthday-cake flavor, add 1/4 teaspoon almond extract to the milk.
- Keep the cups upright and level while filling and freezing.
- Store frozen pops in their paper cups inside a freezer-safe container for up to 2 weeks.
- Prep Time: 20 minutes
- Category: Dessert
- Method: Freezing
- Cuisine: American
Nutrition
- Serving Size: 1 popsicle
- Calories: 96
- Sugar: 14
- Sodium: 180
- Fat: 2
- Saturated Fat: 1
- Unsaturated Fat: 1
- Trans Fat: 0
- Carbohydrates: 18
- Fiber: 0
- Protein: 2
- Cholesterol: 7