Diving into the heart of Mexican street food, we uncover the vibrant and tantalizing world of Chilindrina, a snack that’s as rich in flavor as it is in history. This article peels back the layers of this beloved treat, guiding you through its origins, ingredients, and the myriad ways to enjoy it. Whether you’re a culinary expert or a curious foodie, prepare to embark on a flavorful journey that promises to delight your taste buds and enrich your understanding of Mexican cuisine.
Introduction to Chilindrina Food
Introduction to Mexican Street Food
Ah, Mexican street food, a symphony of flavors that dances on the palate! It’s not just food; it’s a cultural experience, a way to connect with the heart of Mexico through every bite. Among the stars of this culinary show is Chilindrina, a snack that encapsulates the essence of Mexican street food with its simple yet profound flavors.
What is Chilindrina Food?
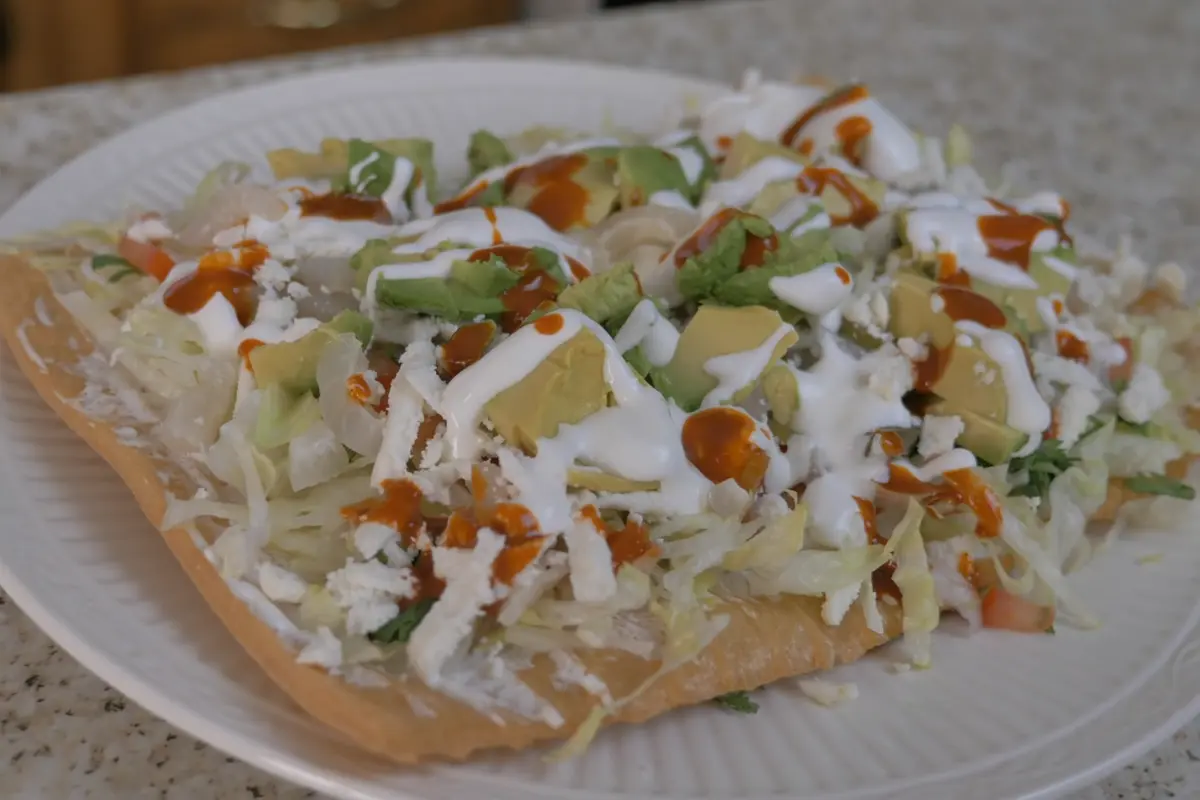
So, what’s the scoop on Chilindrina? Originating from the bustling streets of Mexico, this snack is a celebration of texture and taste. Imagine a base of deep-fried wheat, crunchy and golden, topped with a riot of fresh vegetables, tangy sauces, and sometimes, a sprinkle of cheese or a dash of spicy pickled pork. It’s customizable, it’s delicious, and it’s everything you want in a snack that’s both filling and bursting with flavor.
The history of Chilindrina is as colorful as its ingredients. It’s said to have been born out of the creativity of street vendors, looking to offer something unique and satisfying to their customers. And boy, did they hit the jackpot! This snack quickly became a favorite among locals and tourists alike, a must-try for anyone looking to dive into authentic Mexican street food.
But Chilindrina is more than just a tasty treat; it’s a window into the soul of Mexican cuisine, which is all about bringing people together, sharing joy, and creating memories. Whether you’re gathering around a street cart in Mexico or whipping up your own Chilindrina at home, you’re partaking in a tradition that’s been cherished for generations.
So, as we embark on this culinary adventure, let’s keep our minds open and our forks ready. We’re about to explore the ins and outs of Chilindrina, from its humble beginnings to the many ways you can enjoy it today. Whether you’re a seasoned chef or a curious food enthusiast, there’s something in this journey for everyone. Let’s dive in and discover the magic of Chilindrina, a snack that’s as rich in history as it is in flavor.
Ingredients and Preparation
Key Ingredients of Chilindrina
Let’s start with the basics: what goes into a Chilindrina? At its heart, this snack is a canvas waiting for your culinary creativity. The base is a crunchy, deep-fried wheat pellet known as Chicharrones de Harina. Imagine biting into this crispy delight, its texture both light and satisfying.
Now, for the toppings. Fresh vegetables are key. We’re talking about cucumbers, tomatoes, and lettuce, all adding that fresh crunch. Then, add some heat with jalapeños, and don’t forget the creamy avocados. A sprinkle of queso Cotija adds a salty kick, while a dollop of crema Mexicana brings everything together with its slightly tangy flavor.
Step-by-Step Preparation
Ready to make your own Chilindrina? It’s easier than you think! First, take those wheat pellets and fry them until they’re perfectly crispy. This is your base, your starting point for deliciousness.
Next, chop up your veggies. Cucumbers, tomatoes, jalapeños, and lettuce – get them all ready. This is where the freshness comes in, balancing the crunch of your base.
Now, the fun part: assembling your Chilindrina. Spread a layer of mayonnaise or crema Mexicana on the crispy wheat base. Then, pile on your chopped veggies. Add slices of avocado for that creamy texture, and sprinkle with queso Cotija for a salty finish. A dash of your favorite hot sauce adds that final kick.
And there you have it, a Chilindrina that’s as fun to make as it is to eat. Each bite is a mix of crunchy, creamy, spicy, and fresh – a true celebration of flavors. So, why not give it a try? Dive into the world of Mexican street food with your own homemade Chilindrina. It’s a journey of taste that promises to be as exciting as it is delicious.
What is the recipe for making chilindrinas?
Preparing the Starter and Dough
To make chilindrinas, start by preparing the starter. Measure or weigh the flour, gently spoon it into a cup, and remove any excess. In a medium-large bowl or the bowl of a stand mixer, combine the flour, yeast, and water. Cover the bowl and allow the starter to rest for 1 hour until it becomes bubbly.
Next, it’s time to make the dough. Measure or weigh the flour for the dough and add it to the bowl with the starter, along with the remaining dough ingredients. Mix and knead the dough using your hands, a stand mixer, or a bread machine set to the dough cycle. The goal is to form a sticky, elastic dough that should take about 6 to 8 minutes to achieve. Avoid adding more flour as the dough is meant to be soft and stick to the sides of the bowl.
For the topping, combine the sugar, salt, vanilla, and butter in a medium bowl until smooth. Gradually add the flour, mixing well until a thick paste is formed. Remember to set aside the egg white for later use.
Transfer the dough to a greased or floured work surface and divide it into 10 equal pieces, each weighing around 89g. Roll each piece into a ball and place them on a greased or parchment-lined baking sheet, ensuring some space between them.
Crafting the Topping and Baking the Chilindrinas
To prepare the topping, divide it into 10 portions, around 33g each. Flatten each portion into a 3″ to 4″ disk by placing them between parchment or wax paper and rolling with a rolling pin or using your hands.
Lightly beat the reserved egg white and brush the top of each ball of dough with some of it. Place one of the topping disks on each ball and slightly flatten the rolls. Reserve the remaining beaten egg white.
Allow the chilindrinas to rise for 30 to 45 minutes, covered, until they become noticeably puffy. Meanwhile, preheat the oven to 350°F (180°C) with a rack positioned in the center.
Just before baking, brush the topping with the remaining beaten egg white and sprinkle sparkling sugar over each one for an extra touch of sweetness and texture.
To prevent the bottoms from over-browning, you can nest the pan of chilindrinas into a second baking sheet.
Bake the chilindrinas in the preheated oven for 18 to 24 minutes, or until they turn golden brown. Remove them from the oven and let them cool on the pan until they are comfortable to handle. Chilindrinas can be enjoyed warm or at room temperature.
Variations and Serving Suggestions
Customizing Your Chilindrina
One of the best things about Chilindrina? You can make it your own! Love seafood? Add some grilled shrimp. Fancy something meaty? Pickled pork is your friend. And if you’re keeping it veggie, just stick with the fresh produce and maybe throw in some extra avocados or a vegan cheese alternative. The sky’s the limit!
Serving and Pairing Ideas
Now, how do you turn this snack into a feast? Easy! Serve your Chilindrina with a side of your favorite drink. Think refreshing agua fresca or a cool soft drink. It’s all about finding that perfect combo of spicy, crunchy snack and a sip of something cool to wash it down.
And there you go! Whether you’re spicing it up with extra toppings or keeping it simple, Chilindrina is a versatile, delicious treat. Perfect for a party, a family snack, or just because. Why not get creative and see what amazing variations you can come up with?
Nutritional Information and Health Considerations
Nutritional Breakdown
Chilindrina is more than just tasty. It’s got nutrients, too. But remember, it’s a treat. The base, made from wheat, gives you energy. The veggies on top add vitamins and fiber. If you add cheese and sauces, you’re getting some fat and protein as well. It’s all about balance.
Dietary Considerations
Thinking about health? You can tweak Chilindrina to fit your diet. Gluten-free? Use gluten-free wheat pellets. Watching calories? Go easy on the cheese and sauces. There are many ways to make Chilindrina healthier. Just play around with the ingredients. You can still enjoy its yummy taste, no matter your dietary needs.
Mastering the Art of Chilindrina: Essential Tips
Crafting the Perfect Base and Balancing Flavors
Making Chilindrina is an adventure. It’s a dish full of joy and flavor. Want to make it just right? Here are some tips to guide you.
Start with the Right Base: The crunch of Chilindrina comes from the wheat pellets. Make sure they’re fried to perfection. They should be golden and crispy. This makes the perfect foundation for your toppings.
Freshness is Key: The beauty of Chilindrina lies in its fresh toppings. Use fresh veggies. They add color, crunch, and flavor. Fresh lettuce, ripe tomatoes, and crunchy cucumbers make a big difference.
Balance Your Flavors: Chilindrina is all about balance. Mix spicy, tangy, and creamy flavors. Add jalapeños for heat. Lime juice for tang. Crema Mexicana for creaminess. Find what tastes good to you.
Enhancing with Toppings and Enjoying the Process
Experiment with Toppings: Don’t be afraid to try new things. Love avocados? Add extra. Want more protein? Try grilled chicken or pickled pork. Make your Chilindrina your own.
The Sauce Matters: A good hot sauce can change everything. It adds spice and depth. Try different brands. Find one that you love. It’s the finishing touch that ties everything together.
Texture Contrast: Chilindrina isn’t just about taste. It’s also about texture. The creamy avocado against the crispy base. The softness of the tomatoes with the crunch of the lettuce. These contrasts make each bite interesting.
Prep Ahead: If you’re making Chilindrina for friends or a party, prep your veggies ahead of time. Cut everything up and keep it in the fridge. Then, when it’s time to eat, you can assemble quickly.
Serving Size: Chilindrina can be filling. Consider the size of your wheat pellets. One might be enough for a snack. Two could be a meal. Think about who you’re serving.
Keep It Colorful: Part of Chilindrina’s appeal is how it looks. Bright veggies. Creamy sauce. It should be a feast for the eyes. Arrange your toppings with care. Make it look as good as it tastes.
Enjoy the Process: Finally, have fun with it. Cooking is about more than just making food. It’s about creating something that brings joy. Put on some music. Enjoy the smells and tastes. Share your creation with people you love.
With these tips, you’re well on your way to making delicious Chilindrina. Each batch is a chance to try something new. So, dive in. Experiment. And most importantly, enjoy every bite.
Chilindrina FAQs: Your Questions Answered
Getting Started with Chilindrina
Can I make Chilindrina without frying?
Yes, you can! Bake the wheat pellets in the oven for a lighter version. They won’t be as crispy but still tasty.
What if I can’t find Chicharrones de Harina?
No worries. Use pita or tortilla chips as a base. It’s different but still delicious.
How long do you let the chilindrinas rise before baking?
To ensure the chilindrinas are light and fluffy, they need to undergo a rising process before baking. After shaping the dough into balls and placing them on a baking sheet, allow the chilindrinas to rise for a period of 30 to 45 minutes. It is important to cover the chilindrinas during this time to create a warm and draft-free environment that promotes a noticeable increase in their size. Essentially, this rising process allows the yeast in the dough to ferment, resulting in a lighter texture and improved flavor. While the chilindrinas are rising, you can preheat the oven to 350°F, ensuring it reaches the desired temperature by the time the rising period is complete.
How do you make the starter for the chilindrinas dough?
To make the starter for the chilindrinas dough, start by weighing the required amount of flour. Alternatively, you can measure it by gently spooning it into a cup and then removing any excess flour. Use a medium-large bowl or the bowl of a stand mixer to combine the flour, yeast, and water. Make sure to cover the bowl to create an ideal environment for the starter. Let it rest for about 1 hour, allowing the mixture to become bubbly. This process is crucial in the formation of the starter for the chilindrinas dough.
Customizing Your Chilindrina
Can I add meat to Chilindrina?
Absolutely. Grilled chicken or beef works great. It adds protein and flavor.
Is there a cheese substitute for vegans?
Yes. Use nutritional yeast or vegan cheese. They give a cheesy flavor without dairy.
How do you shape and finish the chilindrinas before baking?
To shape and finish the chilindrinas before baking, follow these steps:
1. Take the topping and divide it into 10 equal portions, approximately 33g each.
2. Place one portion of the topping between two pieces of parchment or wax paper.
3. Use a rolling pin or your hands to flatten the portion into a disk, which should measure about 3″ to 4″ in diameter.
4. Repeat this process for each portion of the topping.
5. Set aside one egg white and lightly beat it.
6. Brush the top of each ball of dough with some of the beaten egg white.
7. Take one of the flattened disks of topping and place it on top of each ball of dough.
8. Gently press down to slightly flatten the rolls.
9. Keep the remaining beaten egg white aside for later use.
10. Now the chilindrinas are shaped and finished, and ready to be baked as instructed.
Perfecting the Flavor
How do I make my Chilindrina spicy?
Add more jalapeños or a spicier hot sauce. Adjust to your taste.
My Chilindrina is too dry. What can I do?
More sauce! Crema Mexicana or mayonnaise adds moisture. Avocado works too.
Serving and Storing
How do I serve Chilindrina at a party?
Make a toppings bar. Let guests build their own. It’s fun and interactive.
Can I make Chilindrina ahead of time?
It’s best fresh. But you can prep the toppings earlier. Assemble just before serving.
How do you store leftover chilindrinas?
To properly store leftover chilindrinas, it is recommended to wrap them securely and keep them at room temperature for up to 3 days. For longer storage, you can freeze the chilindrinas and they will remain fresh for up to a month.
Troubleshooting
Why did my wheat pellets not puff up?
The oil might not have been hot enough. Make sure it’s the right temperature next time.
How to let the chilindrinas cool before serving?
Remove the baked chilindrinas from the oven and let them rest on the pan until they’re cool enough to handle. Enjoy them warm or at room temperature.
How to bake the chilindrinas and prevent over-browning?
Just before baking, brush the topping with beaten egg white and sprinkle sparkling sugar over each one. If available, nest the pan of chilindrinas into a second baking sheet for extra protection against over-browning.
How to preheat the oven and position the rack?
Preheat the oven to 350°F with a rack in the center.
How to let the chilindrinas rise before baking?
Let the chilindrinas rise for 30 to 45 minutes, covered, until they’re noticeably puffy.
How to brush the dough with beaten egg white?
Lightly beat the reserved egg white. Brush the top of each ball of dough with some of the beaten egg white.
How to flatten the topping into disks?
Divide the topping into 10 portions, about 33g each. Flatten each portion into a 3″ to 4″ disk by placing portions between two pieces of parchment or wax paper and rolling with a rolling pin or flattening with your hands.
How to divide the dough into equal portions?
Transfer the dough to a greased or floured work surface. Divide it into 10 pieces, approximately 89g each. Roll each piece into a ball.
How to make the topping for chilindrinas?
In a medium bowl, combine sugar, salt, vanilla, and butter until smooth. Stir in flour in two additions to make a thick paste. Set the topping aside.
Embracing the Joy of Chilindrina: A Culinary Adventure Concludes
In conclusion, the journey through the world of Chilindrina has been a flavorful adventure, showcasing the richness of Mexican street food. From its crunchy base to the vibrant toppings, Chilindrina embodies the spirit of Mexican cuisine: diverse, colorful, and full of life. This guide has offered a glimpse into the simplicity and versatility of making Chilindrina, encouraging even the most novice cooks to dive into the art of Mexican cooking. Whether you’re seeking a new culinary challenge or simply looking to bring a taste of Mexico into your home, Chilindrina stands as a delicious testament to the joys of cooking and sharing food. So, as we wrap up this culinary exploration, remember that food is more than just sustenance; it’s a bridge between cultures, a catalyst for community, and a source of endless delight. Happy cooking, and may your Chilindrina be as joyful to make as it is to eat!
Print
What is Chilindrina Food?
- Total Time: 25 minutes
- Yield: 4 servings 1x
Description
Chilindrinas are a quick and tasty Mexican snack, featuring crunchy wheat pellets topped with fresh veggies, creamy avocado, tangy lime juice, and spicy hot sauce, all garnished with crumbled queso cotija. This dish is a delightful mix of textures and flavors, perfect for a flavorful snack or appetizer.
Ingredients
- 5–6 Mexican Wheat Pellets, Chicharrones de Harina
- 1 Large Cucumber, thinly sliced
- 2 Roma Tomatoes, diced
- 2 Jalapeños, finely chopped
- 1/2 Red Onion, thinly sliced
- 3–4 Limes, juiced
- Salt & Pepper to taste
- 1/2 Iceberg Lettuce or Cabbage, shredded
- 3 Medium Avocados, mashed
- Queso Cotija, crumbled
- Pickled Pork Rinds, chopped (optional)
- Hot Sauce like Valentina
- Mayonnaise or Crema Mexicana
Instructions
- In a large bowl, combine the sliced cucumber, diced tomatoes, chopped jalapeños, and sliced red onion.
- Add the lime juice, salt, and pepper to the vegetable mixture and toss until well combined.
- Gently fold in the mashed avocados.
- On a serving plate, lay out the chicharrones de harina.
- Top the chicharrones with the vegetable and avocado mixture.
- Garnish with shredded lettuce or cabbage, crumbled queso cotija, and chopped pickled pork rinds if using.
- Drizzle with hot sauce and a dollop of mayonnaise or crema Mexicana to taste.
Notes
- Versatility in Ingredients: The recipe allows for flexibility with the vegetables and toppings, making it easy to adjust based on personal taste preferences or availability of ingredients. This adaptability makes Chilindrinas a great option for incorporating seasonal produce or catering to different dietary needs.
- Balance of Flavors and Textures: Chilindrinas offer a harmonious balance between the crunchy texture of the wheat pellets and the creamy softness of the avocado, enhanced by the acidity of lime juice and the heat from the jalapeños and hot sauce. This combination ensures a satisfying and multi-dimensional eating experience.
- Cultural and Culinary Significance: Originating from Mexican street food traditions, Chilindrinas are not just a snack but a cultural experience, offering a taste of Mexico’s rich culinary heritage. Preparing and enjoying this dish is a way to celebrate and appreciate the vibrant flavors and communal spirit of Mexican cuisine.
- Prep Time: 20 minutes
- Cook Time: 5 minutes
- Category: Lunch
- Cuisine: Mexican
Nutrition
- Serving Size: 4 servings
- Calories: 300 kcal per serving
Keywords: Chilindrina snack details, Mexican Chilindrina guide, understanding Chilindrina, Chilindrina food facts, Chilindrina,